.png)
Manage your money day or night, anywhere you are.
Pelican@Net Online Banking
- FREE 24/7 service
- Check balances & account history
- Transfer funds between accounts
- Order checks
- Set up account alerts
- Sign up for eStatements
- Make payments online with Bill Pay
- Manage your finances and budget with MyFinance
- Download to Quicken® or MS Money®
- Highly secure & easy to use
Already have an account?
Bill Pay
- Save money on postage fees
- Fast, free, and easy
- Pay all your bills on one screen
- Payee information stored for later use
- Schedule payments in advance
- Set up recurring payments
- Make one-time payments to anyone in the country
It's never been easier to control your money. Breeze through paying your bills all on one screen—for free!
Log into your Pelican@Net account & select the Bill Pay tab at the top of the page to get started.
PelicanMobile
- Free, fast, & secure service¹
- Reset your password
- Open accounts
- Keep track of balances, bill pay, credit card or loan payments, and more on-to-go
- Enjoy SMS text alerts & banking
- Control your Pelican debit or credit cards
- Deposit checks
- View FICO® score²
- Enroll in eStatements
- View & redeem Pelican Points
- Get payment relief
- Save time & effort—avoiding an extra trip to your branch
If you have never used Pelican@Net before, sign up today! You will need to have your member number, SSN, and email address on your account with Pelican handy.
Need assistance? Call 1-800-351-4877, chat with us, or visit a Pelican branch to have a representative set up your Pelican@Net account today!
FAQS
Same Day Processing of ACH Account Debits
What’s changed?
Previously, ACH credits posted multiple times per day while ACH debits were posted only once per day. As of September 15, 2017, ACH debits are processed multiple times per day.
How does this affect you?
Previously, you may have seen debits posting to your checking or savings account once per day. Now, transactions such as online bill payments, will post multiple times throughout the day. For example, you may pay a bill online in the morning, and it will now clear your account the same day.
What are the benefits of same day ACH debits?
Same day ACH debits will help you make bill payments quicker as well as move funds to accounts at other financial institutions faster.
Will my direct deposit be affected?
No. There will be no change to when your direct deposit is posted.
How to Set Up PelicanMobile
Your accounts should be anywhere you are. Download our mobile app for Android and iOS today!
STEP 1:

Visit Apple’s App Store or the Google Play Store and search Pelican State Credit Union to download our app.
STEP 2:
What’s new? When you first open our app, you will see a few images explaining the latest features of our app. You can tap Skip on the top right to skip these images or tap Next to see other cool app features.
Once you’re done viewing the features of the app, tap Done to move on to the app.
STEP 3:
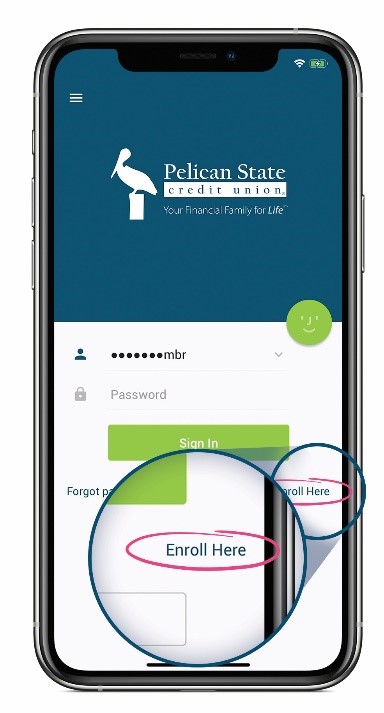
Enter the username and password that you created using Pelican’s Online Banking system. If you don’t have an online banking login, tap Enroll Here.
To enroll, you’ll need your member number (account number) and the SNN, last name, and date of birth of the primary account holder (member).
Then, follow the steps listed to complete enrollment and log in to access your account. It’s as easy as 1, 2, and 3!
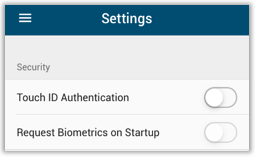
Want to turn on Touch Authentication and Biometrics on Startup to login with your fingerprint or Face ID?
Tap Settings on the app menu, turn the sliders under Security on, and continue through the instructions until complete!
*Standard text messaging and data rates apply for mobile banking services. This guide is for Pelican State Credit Union members only. For questions, please contact a Pelican State Credit Union representative by calling 1-800-351-4877 or chatting with us during business hours on pelicanstatecu.com.
How to Enroll in Pelican@Net Online Banking
Access your account from anywhere you can access the internet.
STEP 1:
Setting up online banking is easy! Before you start, you will need a few pieces of information. Gather your:
- Primary Account Holder’s Social Security Number
- Primary Account Holder’s Member Number (Account Number)
- Valid Email Address
STEP 2:
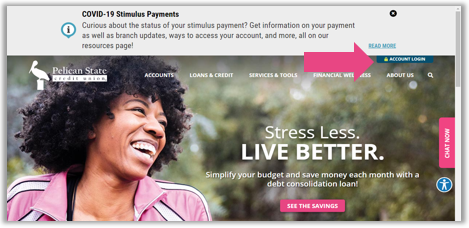
Visit pelicanstatecu.com and click on the Account Login tab. By clicking Account Login, you’ll see a box where you can start the sign up process!
STEP 3:
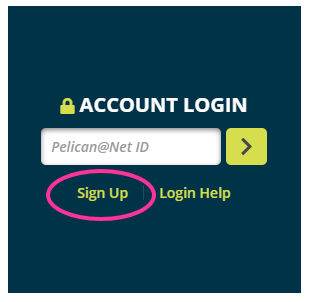
Click Sign Up to see the standard disclosures for using our online system. If you agree to them, click the I Agree button to proceed.
STEP 4:
Enter your Social Security Number (with no dashes, please), your member number (account number), and the email address of the primary account holder on file with Pelican. Click Continue to keep going!
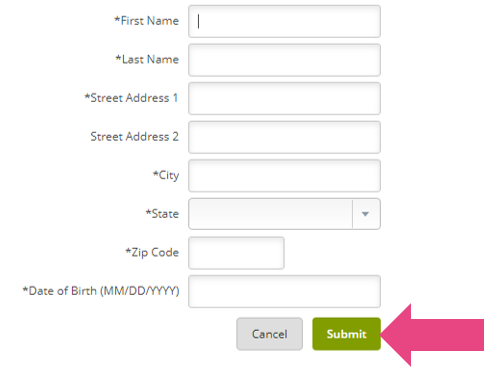
Continue to type in your information. We need to know your name, your address, and date of birth. Press Submit to continue!
To make sure you’re sure about signing up for online services, we’ll send an email notification to you to verify your email.
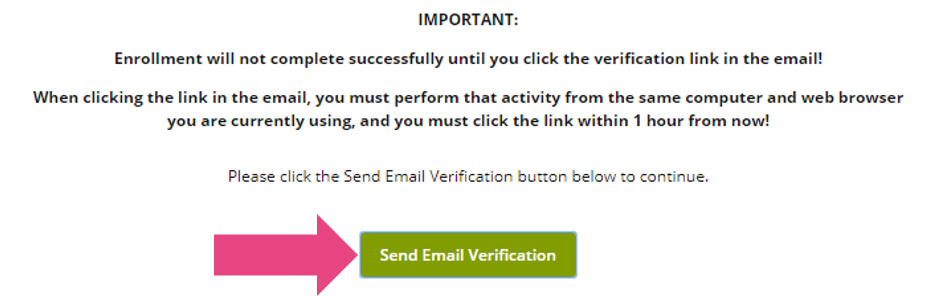
The screen above will pop up, and you can click Send Email Verification to send a verification email to the email address you listed earlier.
STEP 5:
You should receive the email in a matter of minutes. Click on the link in the email to verify your email address.
STEP 6:
Follow the steps from there listed to enroll in online banking. You will need to create a User Name. We have some rules for this. Your User Name:
- Must be between 4 and 12 characters
- Must start with a letter
- May contain numbers
- Must not contain special characters
Click Submit to make it official. A screen will pop up with a temporary password for you to use for signing in for the first time.
STEP 7:
You will need to change the temporary password.
We take security seriously here so, your online passwords will need to be changed every 6 months. Don’t worry! You’ll get an email alert that the password needs to be changed.
STEP 8:
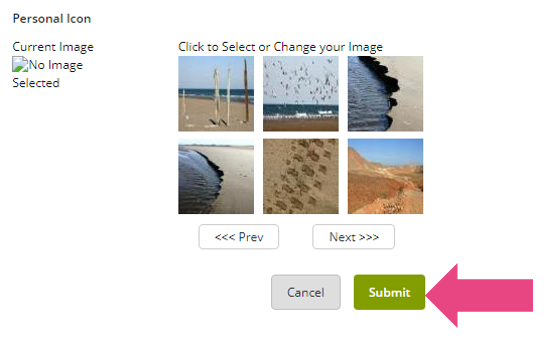
Next, you will choose a Personal Identification Image. It’s another very important step to keep your access safe and secure. This image will show up each time you sign on. Click Submit and Continue to select and confirm your chosen image.
If your chosen image doesn’t appear at any time when you’re logging in, contact us.
STEP 9:
Next, you will need to select and answer some security questions. You’ll need to do this each time your password is updated. Click Submit to continue.
STEP 10:
Then, type in your main phone number. Secondary numbers are optional. Click Submit to continue on the process!
You’ll see a message thanking you for completing the verification process.
STEP 11:
Now, create a question and answer for the password reset process. This question will be presented when it is time to change your password! Click Submit to continue.
Now, you should be signed in to online banking!
Don’t forget to sign up for our free Bill Pay service once you’re logged in.
Plus, you can also use this username and password to sign into our mobile app.
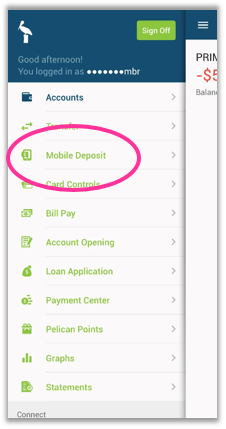
How to Make a Mobile Deposit From Your Smart Phone
Depositing a check from your smart phone is as easy as 1-2-3! (Well, there are actually 8 steps.)
STEP 1:
Sign in to our PelicanMobile app on your device.
STEP 2:
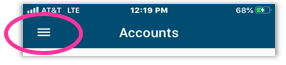
Tap the 3 lines on the left side of the screen, to expand the app’s menu options.
STEP 3:
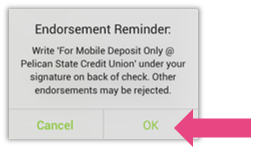
Tap Mobile Deposit on the app’s menu and read the important endorsement reminder that pops up.
To make a mobile deposit, you must make sure the endorsement (the way your check is signed) is correct. Under your signature on the back of the check, write “For Mobile Deposit Only @ Pelican State Credit Union.”
The endorsement reminder will pop up each time you attempt to make a mobile deposit. Press OK to proceed.
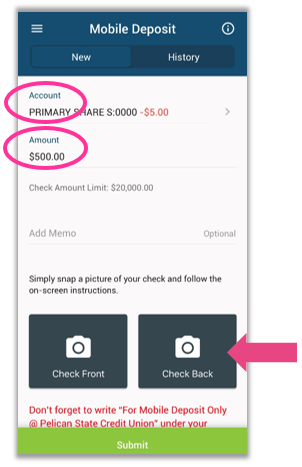
STEP 4:
Select the Account that you want to put the mobile deposit in.
STEP 5:
Enter the Amount of the mobile deposit and an optional memo.
STEP 6:
Select Check Front and Check Back. When you select each one, take a picture of the front and back of the check you are depositing.
STEP 7:
Review and continue.
Once you have taken a picture of the front and back of all checks being deposited, you will be able to review the pictures.
STEP 8:
When you are sure everything is correct, tap Submit to send your deposit!
How to Enroll in eStatements Using PelicanMobile
eStatements are a great way to help the environment and make sure you meet your Kasasa qualifiers! Enroll through PelicanMobile in a few simple steps.
STEP 1:
Sign in to our PelicanMobile app on your device.
STEP 2:
Tap the three lines on the left side of the screen to expand the app’s menu options.

STEP 3:
Scroll all the way down to the bottom of the menu. Then, locate and tap Settings.
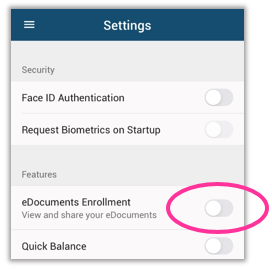
Here, you will see options such as Request Biometrics on Startup and Quick Balance.
Locate the eDocuments Enrollment option and tap the button to the right of it.
STEP 4:
Carefully read the eDocuments Agreement that comes up.
When you finish reading, tap Accept and Enroll if you agree to accept and enroll in eStatements. By doing this, you agree to no longer receive paper statements from Pelican.
STEP 5:
You will be brought back to the Settings page.
Notice that the button to the right of the eDocuments Enrollment option is now turned on.
STEP 6:
Tap the three lines to the top left of the screen to expand the menu again. Tap Statements.
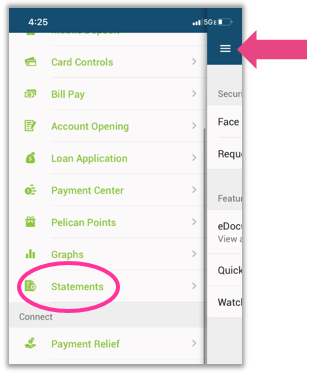
You will now see a list of your monthly statements and access them at your convenience!
How to Set Up An Automatic Transfer to Loans & Accounts in Pelican@Net
Easily transfer funds between your Pelican accounts on an automated schedule so your funds are always where you need them, when you need them.
STEP 1:
Sign in to your Pelican@Net online banking account via pelicantatecu.com to get started.
STEP 2:
Select the Transfers tab and choose New from the dropdown list.
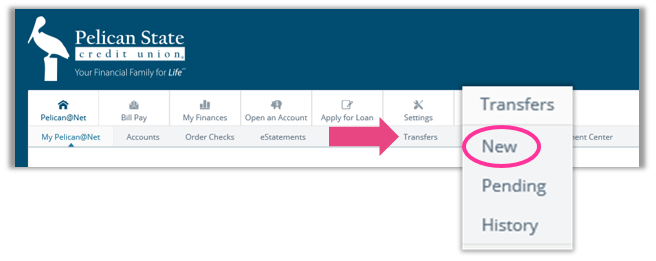
Once selected, a screen will appear for you to fill out your transfer information.
STEP 3:
Complete the information requested on the New Transfer form.
- Choose which Pelican account type you want to Transfer funds from.
- Choose which account to Transfer funds to. You can choose from any savings, checking, credit card, or loan accounts under your membership.
- Choose the transfer frequency under Payment options. Make a One Time transfer, or set it up to recur Weekly, Bi-Weekly, Semi-Monthly, or Monthly.
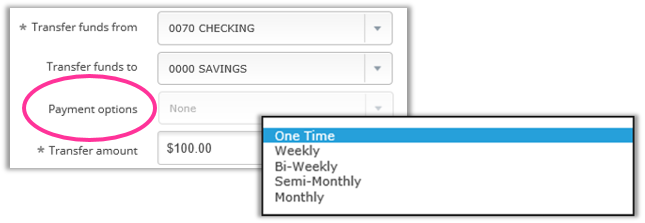
- Choose the Transfer date to begin the recurring transfers. Note, a transfer memo may be added but the memo will only be saved for a One Time transfer on that current date.
STEP 4:
Select Submit to begin processing the transfer request. Then, a confirmation screen will appear. Pause and review the information for accuracy one last time.
STEP 5:
Select Confirm once information is verified as correct. If you need to change the transfer details, select Edit to change the amount, date, or account types.
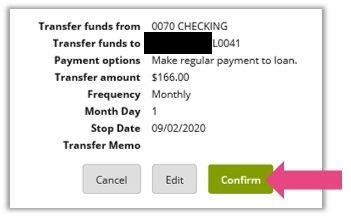
STEP 6:
After confirming the transfer, a receipt will appear to show that the transfer has been successfully scheduled along with a confirmation number. Print or save this page for your records.
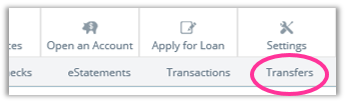
STEP 7:
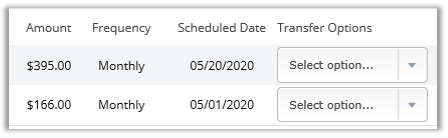
Return to the Transfer tab on the Pelican@Net menu and select Pending to view upcoming transfers and make edits as needed.
How to Transfer Funds to Another Member in PelicanMobile
Venmo who? How about PELMO! Transfer funds to another Pelican member in a matter of moments. No fees and no waiting.
STEP 1:
Sign in to our PelicanMobile app on your device.
STEP 2:
Tap the three lines on the left side of the screen to expand the app’s menu options.
STEP 3:
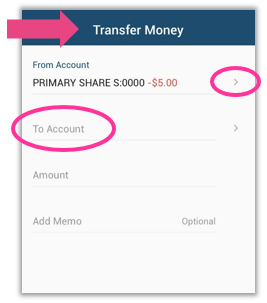
Tap Transfer on the menu. This will open the “Transfer Money” page.
STEP 4:
Ensure that the Account that you would like to transfer From is selected. If not, tap the arrow to the right and select the correct account.
STEP 5:
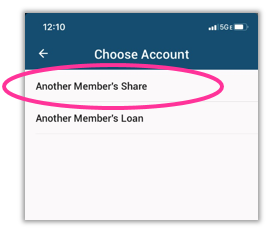
Select the Account you would like to transfer To next.
STEP 6:
From the “Choose Account” page, tap Another Member’s Share.
STEP 7:
After Another Member’s Share is selected, continue to tap and fill in the rest of the information requested.
- Account Number: Enter the member number of the member you wish to transfer funds to.
- Share ID: Enter the share ID of the member’s account you wish to transfer to. This is the four-digit number listed next to the account name in the app (ex: PRIMARY SHARE S:0000).
- Recipient’s Last Name: Enter the last name of the member you wish to transfer funds to.
- Amount: Enter the dollar amount you wish to transfer to another member.
- Memo: Finally tapping to add a memo is optional, but recommended.
STEP 8:
Carefully review and verify that the Account Number, Share ID, Recipient’s Last Name, and Amount is correct. When you are ready to complete the transfer, tap Submit on the bottom of the screen.
How to Sign Documents Using DocuSign
Enjoy security, convenience, simplicity, and save paper with DocuSign. With just a few clicks, you can have your documents signed in no time.
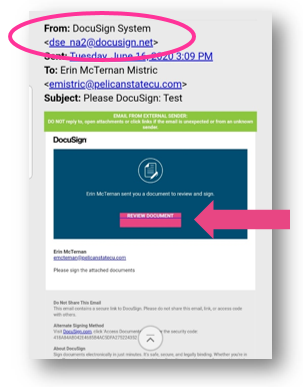
STEP 1:
You will receive an email from DocuSign asking you to, “REVIEW DOCUMENT.” You will click on the pink button, “REVIEW DOCUMENT.”
STEP 2:
Check the box, “I agree to use electronic records and signatures,” and then click “CONTINUE” to move forward.
STEP 3:
Click on the yellow box that says “SIGN” at the bottom.
STEP 4:
It will bring up a signature pad for you to sign with your figure, or a box will appear with your signature options. Once you select your signature, you will click the pink button called “ADOPT AND SIGN.”
This will place your signature on the document.
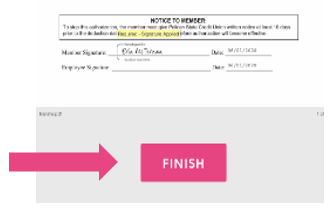
STEP 5:
Click the pink button that says “FINISH.” This will send your documents back to the Pelican Representative who is assisting you.
Download PelicanMobile for FREE to access your accounts anytime, anywhere from your smartphone—it's a virtual branch right at your fingertips!
¹Standard text messaging and data rates apply for Mobile Banking Services. Please consult your mobile carrier for details. Mobile Banking App only available for iPhone and Android platforms. Funds from Remote Deposit may not be available immediately. Credit given for the item deposited is provisional and subject to final approval of the item. You agree to receive all notifications regarding your use of this Service including but not limited to exception notices as required by Regulation CC via electronic message. With respect to each item you send to Pelican State Credit Union for deposit, you agree to indemnify and reimburse Pelican for and hold Pelican harmless from and against any and all losses, costs, and expenses.
²FICO® is a registered trademark of Fair Isaac Corporation in the United States and other countries.